WORD PRESS BLOGS
Create a blog in WordPress was by best decision I have made ever. After creating my own blog I feel like I have property online. I have tried many works. But I didn’t feel good. After a year I realize to create a blog in WordPress. This idea is very useful for me. Now I earn a lot of money from blog. I learn this process I mean create blog in WordPress in very large time. So I think to teach it to my user to get advantage form my skill. That’s way I made this tutorial. In this post I will give you all information with the help of screen shoot to create blog in WordPress in just a few steps. Just read this post and become a good blogger. As I told you many time about Earn money online. This is also very good sources of earn online too. Now I will show you how to create a WordPress blog in just 5 minutes. It very simple to make a WordPress blog. I will give some hints tips and tricks step by steps.
How To Create A Blog In WordPress Step By Step Guide In 5 Min Beginner's Guide.
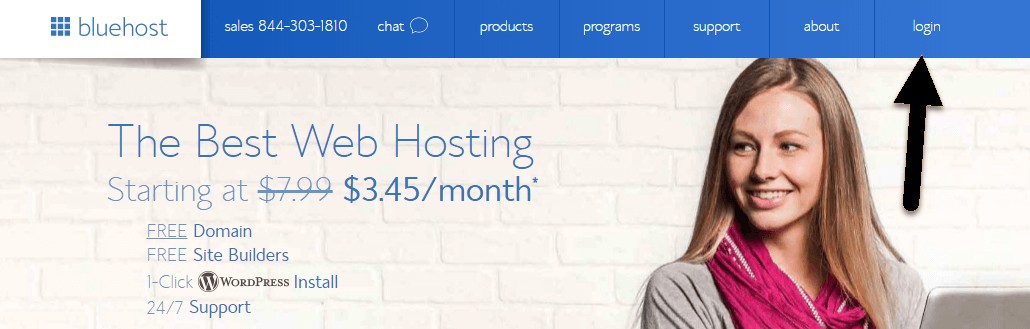
Now let’s get start to create your first WordPress blog by following just a few steps.- Choose Your Hosting - Sign Up for Blue Host WordPress Hosting.
- Select your WordPress hosting package
- Choose your domain name – This is the first step to make WordPress blog
- Create Your Hosting Account – Set up personal information, billing information
- Account activation – Log Into Your Blue host CPanel
- Install WordPress on Blue Host – One-click Install WordPress
- Start to Install WordPress
- Set up WordPress Installation Settings
- Log into WordPress Admin Area dashboard.
Step 1 Choose Your Hosting - Signup For Blue Host WordPress Hosting.
This is the first step when you create a blog in WordPress. Now i am going to give you some important hints. First step is choosing you hosting. Bluehost is providing many hosting plans. Which is contain on many package like limited and unlimited. First of all Open Bluehost Homepage By click on Green Button.
By click on this button Blue host will give up 55% discount in web hosting and domain Buying. Click on the Green Button and get maximum discounts on every product of Bluehost.
Bluehost is changing his plans day by day. You can check it any time.
Step 2: Select Your WordPress Hosting Package
After clicking on Get Start this is the second page of Blue Host. Here will you select hosting plan for your bloggerChoose hosting plan for your blog. Remember if you are only writing I mean your data are contain only on text and images then select plus web hosting plan. I recommend choosing it. Because this is enough for new blogger. After increasing your data you can extend your package. On this package you can host up to blogs.
From here you can get unlimited plans for your blogs to host unlimited WordPress blogs with unlimited Web hosting package. You can also share unlimited videos with your users or visitors. Blue Host Plus shared hosting plan is accurate for beginners.

Step #3: Choose Your Domain Name – This Is The First Step To Make WordPress Blog
After choosing the hosting plan another steps to choose free custom domain name. This company provides you yearly free domain no charge will apply in the first year. Now choose the domain in .com which is worth $15.00. Type your domain name in the text able box to find availability of domain. If your domain is available then OK if not available then try another one. But only in .com.
After completing I mean choosing perfect domain for your blog. Now move on to next step. Which is
Step 4: Create Your Hosting Account – Set Up Personal Information, Billing Information
Account information: Here is some personal information require. Fill this form with your original information. Like your name, Email and phone number should be real ones. Type here your original email address. Because the Blue Host will send you a verification link on email.

Payment Information : Here you will pay for chooses plan. You can pay trough many sources to BlueHost. You can buy Bluehost web hosting though many banking card system. Like if you have credit or debit cards. Bluehost support every type balance card credit card and debit card. You can pay easily. Now Move to another step.

Step #5: Account Activation – Log Into Your Blue Host CPanel
After completing Account information and payment information. Blue host will send you a verification link. Open Your gmail inbox. And check it open the mail which is send to you Blue Host. This mail will contain a link and your payment detail. Verified your account.
As I told you in upper paragraph verified you email address. This mail will include different information such as Log in credentials to Blue Host Cpanel. ( Create A Blog In WordPress )
Cpanel is the dashboard of your web hosting account. Cpanel is not too much difficult in using. It very easy it has been made to easy web hosting arrangements to set up forums websites and social websites etc...
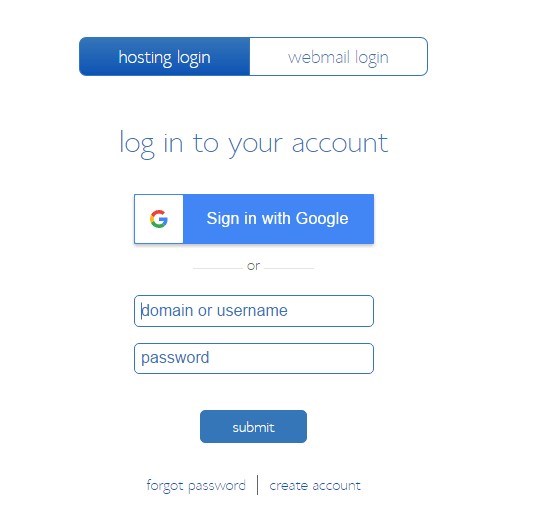
Once you click on the link which blue host sends you through email. You will jump to a Blue Host login page. Here you can login you ID.
Simply you can also Login to your blue host cpanel just click here and click on Login button at the Right side. Click on Hosting login and type you domain or email and password and click submit.
Step #6: Install WordPress On Blue Host – One-Click Install WordPress
When you visit your BlueHost dashboard some promotion pages will appear. You will receive some notification massage some will welcome massages some will be promotion like give below in photo.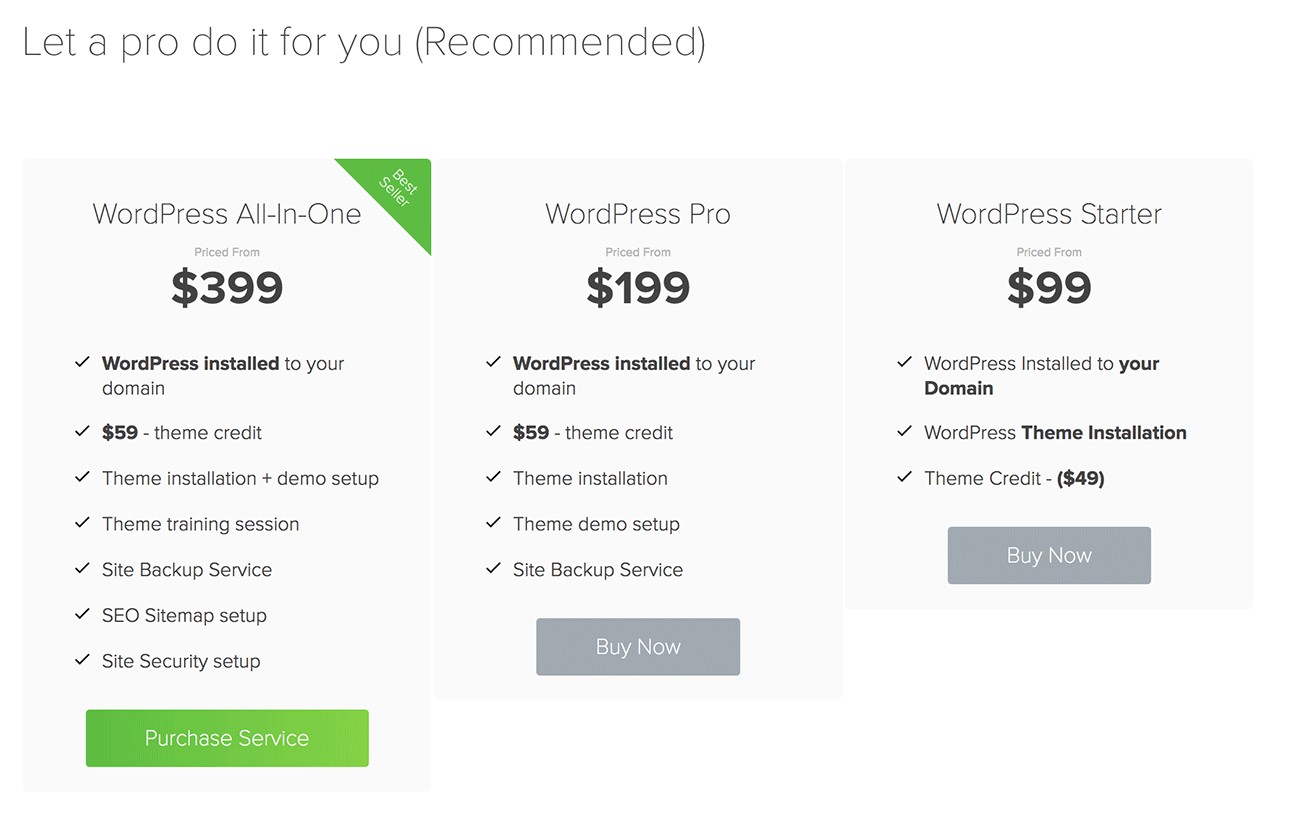
If you want to purchase $100 or $99 you can purchase the service by clicking on the Buy Now button.
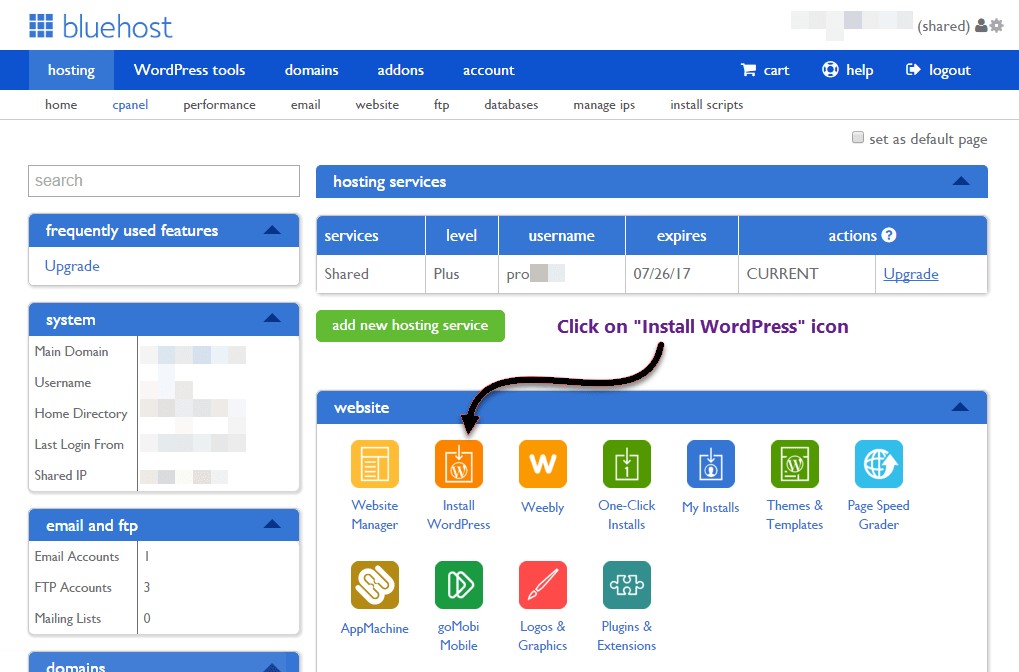
Now Scroll down and click and WordPress icon. After clicking WordPress icon a new page will open.
This page will open now Click on Get Started to install WordPress Web hosting .

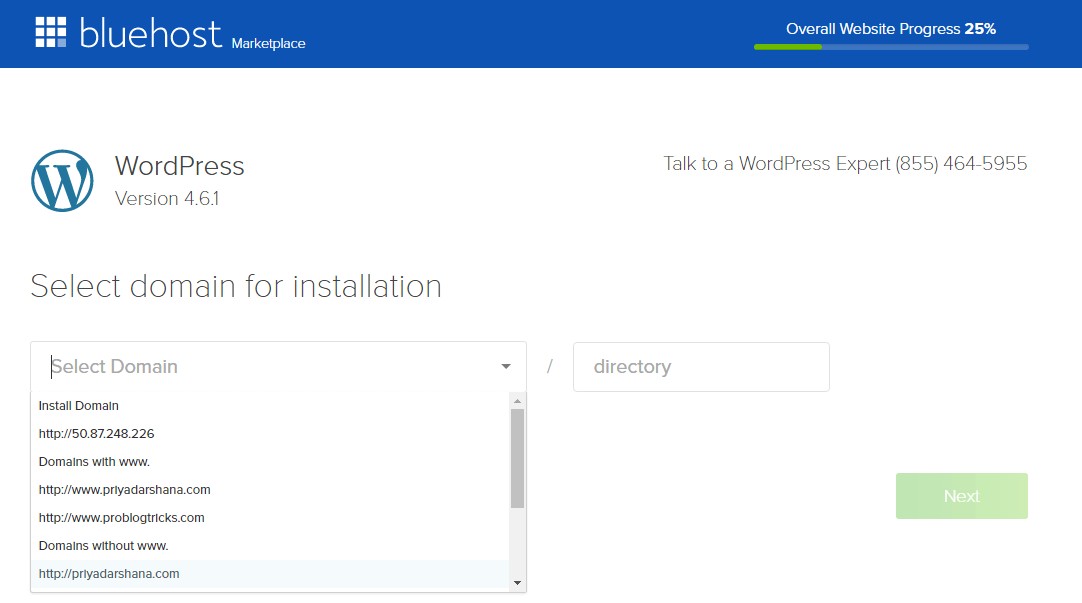
In next page you will be asked to choose the Blog domain that you want to install WordPress and Choose the desire domain from the drop down munue.

Here is some option which require you personal information.
Blog Title: Type here your blog title to know it in bluehost cpanel. This is not important you can give any title like if you want to give your name then no matter but if you want to host more blog. Then you need to type blog domain name. This will help you to understand it easily. Another is SEO Blog Title Which you will give it to your Dashboard.
Admin Username : Here type you name or any name you want to type. But remember this username will help you in Login i mean when you want to login you WordPress dashboard or Bluehost Cpanel the username you will use to sign in. Type or past remember-able name.
Admin Password : This is the most important step. Because mostly newbie bloggers choose very weak password which can be hack very easily. That's way mostly people hack very easily. Always use tough password for sign in WordPress dashboard and BlueHost Cpanel.
Hints to Choose Strong password.
Always use some #@$%^&*( these symblos in your passwords.
Like Moqaddar@#khan&90, Yourname@#$789 some like that.
After completing the blank filling click on Install.


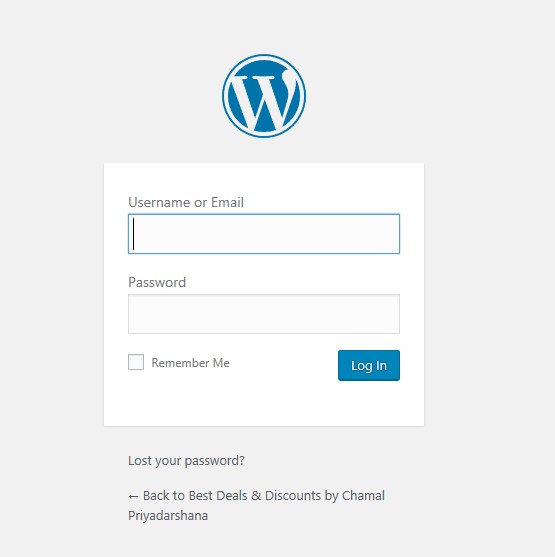
Step #9: Log Into WordPress Admin Area Dashboard.
Now you are completing installation of wordpress. After completing upper process open your default broswer and type your Website like www.yourblog.com/wp-admin. After visiting this this page will open. Here type or past your WordPress user name or Email and Password and Click on Log In.
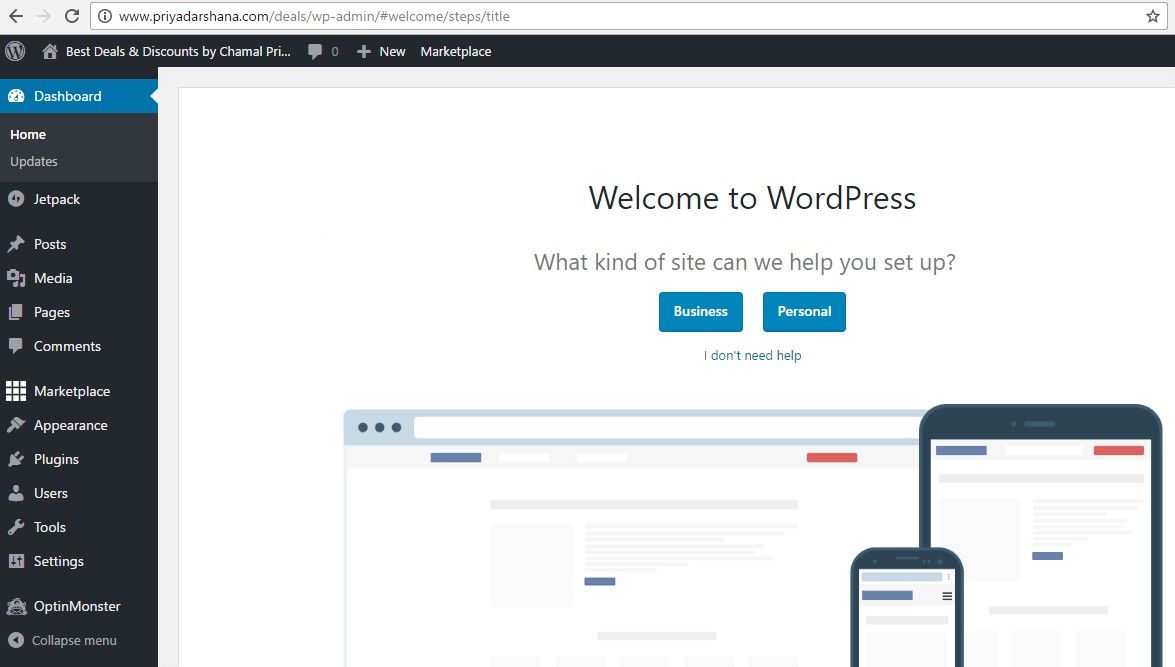
After clicking on Login this page will open. This your dashboard. From here you can do setting posting etc. You can control your website every thing. (Create A Blog In WordPress)
Creating Post In WordPress SEO Ready.
NOw i will teach you how can you do SEO Friendly Posts in WordPress after completing Create A Blog In WordPress.First Login your WordPress dashboard.
Now click on Post >> Add New.
Now a page will open here you can write , upload and publish.
Visit Here::::::wordpress
Thankyou for this wondrous post, I am glad I observed this website on yahoo.
ReplyDeleteHebergement web
Thank you for the great article but i think there should be another big difference like you can create blog in others web 2.0 and make a website free so go to the bluehost reviews 2020 you can make a free website here as well.
ReplyDeleteMajor Thanks for the post. Really thank you! Really Great.wordpress error the site is experiencing technical difficulties
ReplyDeleteBest blog
ReplyDeleteYou are doing great work
Keep going vikash mathsa